Monday 7 August 2023

Performance Tuning SQL Server Queries: Boosting Efficiency and Speed

Introduction:

In the realm of SQL Server database administration, performance tuning plays a pivotal role in enhancing the efficiency and speed of queries. As the volume of data grows and application demands increase, optimizing the execution of queries becomes critical to maintain the overall system performance. This article delves into the fundamental aspects of performance tuning for SQL Server queries, exploring techniques to identify bottlenecks and implement optimizations for optimal query performance.


1. Understanding Query Execution Plan:

The query execution plan serves as a roadmap to understanding how SQL Server processes a query. By analyzing the execution plan, administrators can identify potential performance issues and determine the most efficient way to execute a query. We will discuss the use of SQL Server Management Studio (SSMS) and dynamic management views (DMVs) to obtain query execution plans and analyze them.


2. Indexing Strategies:

Appropriate indexing is one of the most powerful tools for optimizing query performance. We'll explore various indexing strategies, including clustered, non-clustered, and covering indexes, as well as their impact on query execution. Additionally, we'll delve into common indexing pitfalls and best practices to ensure the right indexes are created for your workload.


3. Query Optimization Techniques:

In this section, we'll explore a range of query optimization techniques, such as JOIN optimization, subquery optimization, and using appropriate SQL Server functions efficiently. We'll also discuss how to leverage query hints and plan guides to influence the execution plan when needed, though caution must be exercised when using these features.


4. Query Rewriting and Refactoring:

Sometimes, rewriting or refactoring a query can lead to significant performance gains. We'll discuss common SQL coding patterns that can be improved and explore how to rewrite complex queries into simpler and more efficient forms. Additionally, we'll cover the importance of avoiding correlated subqueries and employing CTEs (Common Table Expressions) for better query performance.


5. Temporal and Cached Data:

Caching query results and employing temporal tables can improve performance significantly by reducing the load on the database server. We'll delve into techniques for caching data, both at the application level and within SQL Server itself, to reduce query execution times and improve overall user experience.


6. Monitoring and Profiling:

To ensure ongoing performance optimization, monitoring and profiling queries are essential. We'll explore SQL Server's built-in tools, such as SQL Server Profiler and Extended Events, to capture query performance data. Additionally, we'll discuss how to leverage performance monitoring tools like SQL Server Performance Monitor to analyze resource utilization and identify performance bottlenecks.


Conclusion:

Performance tuning of SQL Server queries is a continuous process that requires a comprehensive understanding of the database structure, indexing strategies, and query execution plans. By implementing the techniques discussed in this article, you can significantly improve the efficiency and speed of your queries, resulting in better application performance and a more positive user experience. Remember to analyze the impact of any changes thoroughly and continuously monitor your system to ensure long-term success in performance optimization.

Sunday 23 May 2021

SQL Server with Python - An Intro

Everyone uses SQL, and everyone uses Python. SQL is the de-facto standard for databases. Python on the other hand is an all-star, a top language for data analytics, machine learning, and web development. Imagine both, together.

This is actually incredibly easy to setup. We can quickly utilize the dynamic nature of Python, to control and build queries in SQL. The best part? After set-up, you don’t need to do anything.

Both of these amazing tools together, allow us to reach new heights of automation and efficiency.

pyodbc

Our bridge between the two technologies is pyodbc. This library allows easy access to ODBC databases.

ODBC, short for Open Database Connectivity, is a standardised application programming interface (API) for accessing databases, developed by the SQL Access group back in the early 90's.

Compliant database management systems (DBMS) include:

  • IBM Db2
  • MS Access
  • MS SQL Server
  • MySQL
  • Oracle

In this article, we will be using MS SQL Server. For the most part, this should be directly transferable for use with any ODBC compliant database. The only change required should be with the connection setup.

Connect

The first thing we need to do is create a connection to the SQL server. We can do this using pyodbc.connect. Within this function we must also pass a connection string.

This connection string must specify the DBMS Driver, the Server, a specific Database to connect to, and our connection settings.

So, lets assume we want to connect to server UKXXX00123,45600, database DB01 , to do this we want to use SQL Server Native Client 11.0.

We will be connecting from an internal, and thus trusted connection (we do not need to enter our username and password).

cnxn_str = ("Driver={SQL Server Native Client 11.0};"
"Server=UKXXX00123,45600;"
"Database=DB01;"
"Trusted_Connection=yes;")

Our connection is now initialized with:

cnxn = pyodbc.connect(cnxn_str)

If we are not accessing the database via a trusted connection, we will need to enter the username and password that we would usually use to access the server via SQL Server Management Studio (SSMS).

For example, if our username is JoeBloggs, and our password is Password123, we should immediately change our password.

But before changing that horrible password, we can connect like so:

cnxn_str = ("Driver={SQL Server Native Client 11.0};"
"Server=UKXXX00123,45600;"
"Database=DB01;"
"UID=JoeBloggs;"
"PWD=Password123;")
cnxn = pyodbc.connect(cnxn_str)

Now we are connected to the database, we can begin performing SQL queries via Python.

Run a Query

Every query we run on SQL Server now will consist of a cursor initialization, and query execution. Additionally, if we make any changes inside the server, we also need to commit these changes to the server (which we cover in the next section).

To initialize a cursor:

cursor = cnxn.cursor()

Now, whenever we want to perform a query, we use this cursor object.

Let’s first select the top 1000 rows from a table called customers:

cursor.execute("SELECT TOP(1000) * FROM customers")

This performs the operation, but within the server, and so nothing is actually returned to Python. So let’s look at extracting this data from SQL.

Extract Data

To extract our data from SQL into Python, we use pandas. Pandas provides us with a very convenient function called read_sql, this function, as you may have guessed, reads data from SQL.

read_sql requires both a query and the connection instance cnxn, like so:

data = pd.read_sql("SELECT TOP(1000) * FROM customers", cnxn)

This returns a dataframe containing the top 1000 rows from the customers table.

Changing Data in SQL

Now, if we wanted to change the data in SQL, we need to add another step to the original initialize connection, execute query process.

When we execute queries in SQL, these changes are kept in a temporarily existing space, they are not made directly to the data.

To make these changes permanent, we must commit them. Lets concatenate the firstName and lastName columns, to create a fullName column.

cursor = cnxn.cursor()# first alter the table, adding a column
cursor.execute("ALTER TABLE customer " +
"ADD fullName VARCHAR(20)")
# now update that column to contain firstName + lastName
cursor.execute("UPDATE customer " +
"SET fullName = firstName + " " + lastName")

At this point, fullName does not exist in our database. We must commit these changes to make them permanent:

cnxn.commit()

Saturday 22 May 2021

Docker – Installation on Windows

A quick walk through of Docker installation on Windows 10.

1. Downloading the binaries


Download the binaries from the official website.

2. Install WSL 2

Install WSL 2 following instructions provided in the Microsoft website. This step can be done before installing the docker or alternatively we can let docker installer install it for us. Windows Sub System for Linux provides environment to run GNU/Linux environment , command line tools , utilities directly on Windows without installing a VM or dual boot .

3. Installing Docker

Go to the place where we have downloaded the Docker Desktop Installer.exe , right click Run as administrator.
Unlike other installers , Docker installer will not prompt us with many options . The only two options that we will see during installation are “Install required Windows components for WSL 2 “ and “Add shortcut to desktop”. Select both the options and click ok to start the installation.

Wait for the installation to go through.

Once the installation is successful , we will see the following screen :

4. Starting Docker Desktop

Before we can execute any Docker command, we have to first start the Docker desktop. We can start the Docker Desktop from the start menu or from the desktop icon.

The status of the Docker engine is shown at the bottom left corner, it should be green before we can interact with Docker cli .

5. Optional Configuration


There are some configurations in Docker , which are good to have right from the start . Click on the gear icon on the top right side of the Docker Desktop dashboard .

Enabling Kubernetes (Optional)

Navigate to Kubernetes tab and then click on the Enable Kubernetes check box and then click on “Apply & Restart”. This is the fastest way to bring up k8s on our machine.

Enabling WSL 2 Integration

If we have installed any other operating system using WSL2, we don’t have to install Docker once again. We can use the same installation here also by enabling the integration.
Go to settings > Resources > WSL Integration > Enable the integration for the installed OS .

6. Verification

Now that installation is complete, we verify the installation using the following command :
docker info
This will display the details of of Docker Desktop .


For more on this , visit official documentation .


Monday 22 March 2021

Using Group Managed Service Accounts with IIS 10 on Server 2016

 Using NetworkService powered application pools does have the nice effect, that there is no password needed, because the pool will be running with the credential of the webserver machine account, which is a domain account, where no password management is needed.

To access resources on the network, the webserver machine account must be enabled on the network destination and everything is fine and secure using windows authentication or Kerberos

This approach is good enough, if the scenario is limited to one application per server, because the minute you need another application, which does have different requirements in terms of security, then this approach will fail.

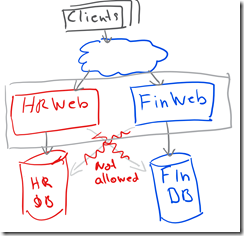
Lets assume, there are 2 web apps on the machine, which each does have its own SQL Server DB and which should not be allowed to access the other ones data.

image

This scenario can only be used with custom domain accounts, if windows authentication should be used.

Only with 2 different accounts and 2 application pools, the security on each database can be limited to the one matching application pool.

But then someone has to manage this domain passwords and make sure, that they are not expiring, but still changed from time to time. A tedious task and the passwords are probably distributed across the company, hopefully in a secure way and not inside XLS or Textfiles…

Another way with Server 2016 is to use Group Managed Service accounts.

This requires, that Active Directory scheme is on level 2012 R2, only then, the feature “Group Managed Service Accounts” can be used.

Setup a Group Managed Service Account

Login to DC:

Enable gMSA globally on Domain

— for Lab environments we use the switch –EffectiveTime, so that we don’t have to wait for 10 hours, which usually should make sure, that AD sync is ready.

Add-KdsRootKey –EffectiveTime ((get-date).addhours(-10));

This will usually be done from the Active Directory team in your environment

Open ServerManager => Tools => Active Directory Administrative Center

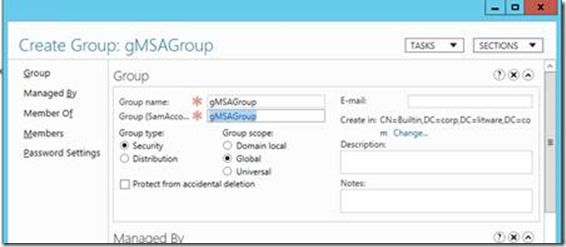
Add new global SecurityGroup named gMSAGroup


clip_image002

clip_image004

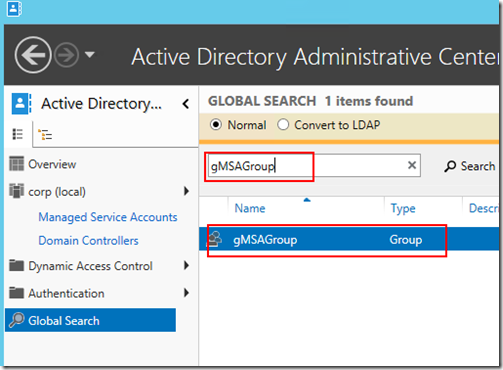
Go to AD Admin Center and search for the newly created group (gMSAGroup)

clip_image005


OR: Use Powershell and first install the Powershell AD-modules

Install-WindowsFeature -Name RSAT-AD-PowerShell

Then create the global security group using

NEW-ADGroup –name “gMSAGroup”  –path “OU=XYZ,DC=mydomain,DC=com” -GroupCategory Security -groupscope Global


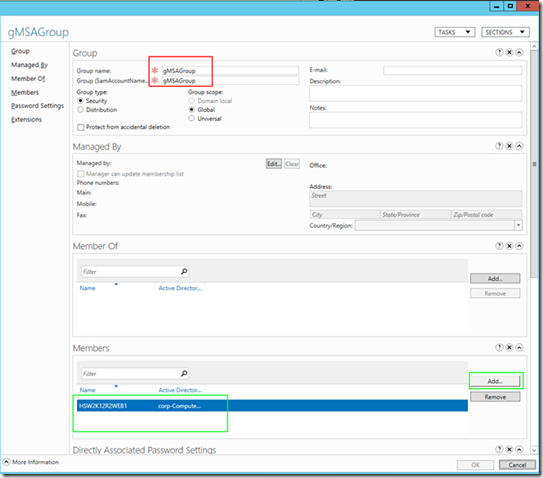
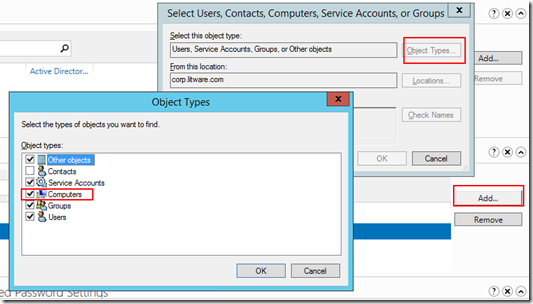
Right click the gMSAGroup entry and add all the memberserver, which should be able to use the Group Service Managed Account IIS1Svc

or use Powershell:

Add-ADGroupMember "gMSAGroup” -Members "Server1$", "Server2$" 

clip_image007

clip_image008

After adding all the memberservers to the Group Managed Service Group, they must be rebooted!

Create first gMSA Account on the DC: (max 15 chars)

New-ADServiceAccount IIS1SvC -DNSHostName IIS1Svc.corp.litware.com -PrincipalsAllowedToRetrieveManagedPassword gMSAGroup

optionally use –path to define, whe the account should be placed into the domain structure, eg:
-Path "OU=OUXy,DC=mydomain,DC=com"

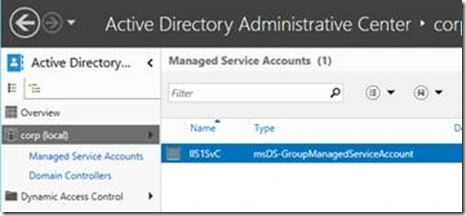
Check in AD Admin Center, that the account is visible
clip_image010S

Switch to MemberServer (HSW2K12R2Web1)

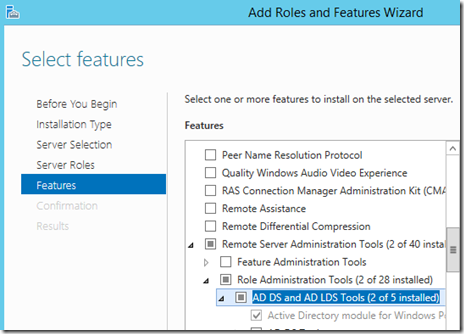
Install on MemberServers: Remote Server Administration Tools via Server Manager to get Active Directory Module for Windows Powershell

OR with Powershell: Install-WindowsFeature -Name RSAT-AD-PowerShell

clip_image011

Open Powershell Admin Console and

Install-ADServiceAccount IIS1Svc

If error is “access denied”, make sure, that the memberserver was added to the allow list of the group service group and the server was rebooted afterwards!

clip_image012

clip_image013

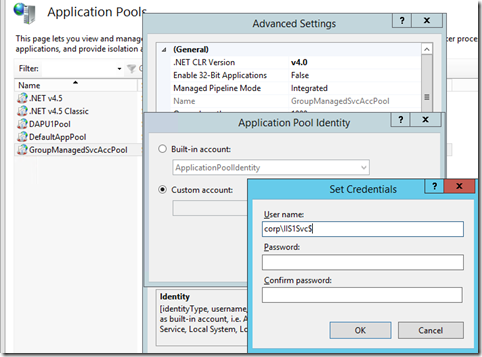
Create new AppPool in InetMgr:

clip_image014

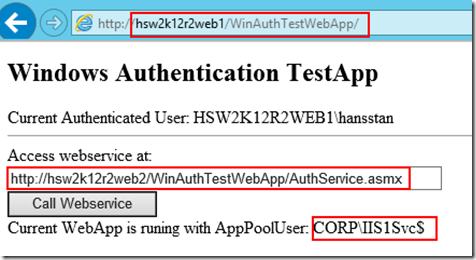
Use this GroupServiceManaged Account and append “$” to the name and leave password empty

Use this Account for a web application.

When this web application will access a resource on another computer, it will then use this GMSA

clip_image015


https://hansstan.wordpress.com/2017/07/05/using-group-managed-service-accounts-with-iis/ 

Friday 19 February 2021

Creating a non-XML format file

Please review Non-XML Format Files (SQL Server) for detailed information. The following command will use the bcp utility to generate a non-xml format file, myFirstImport.fmt, based on the schema of myFirstImport. To use a bcp command to create a format file, specify the format argument and use nul instead of a data-file path. The format option also requires the -f option. In addition, for this example, the qualifier c is used to specify character data, t, is used to specify a comma as a field terminator, and T is used to specify a trusted connection using integrated security. At a command prompt, enter the following command: 


bcp TestDatabase.dbo.myFirstImport format nul -c -f D:\BCP\myFirstImport.fmt -t, -T

REM Review file Notepad D:\BCP\myFirstImport.fmt

https://docs.microsoft.com/en-us/sql/relational-databases/import-export/use-a-format-file-to-bulk-import-data-sql-server?view=sql-server-ver15